
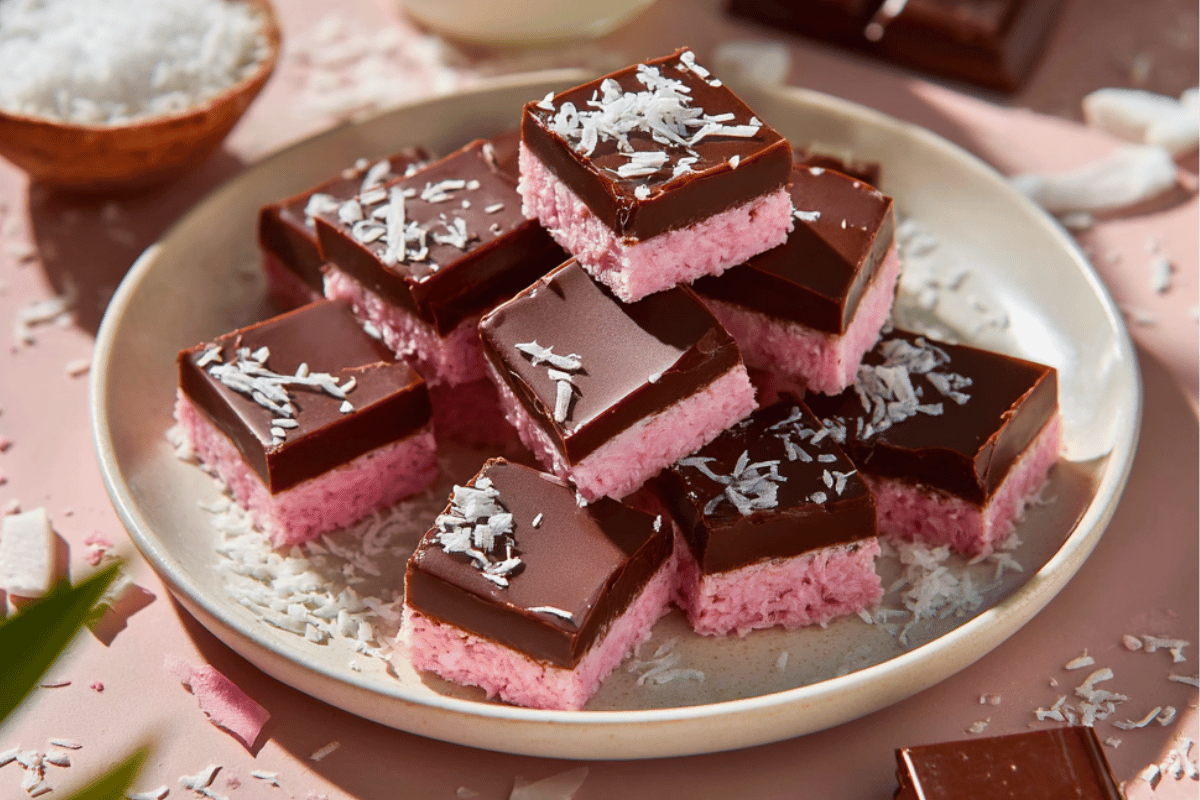
Looking for a no-bake dessert that’s vibrant, rich, and irresistibly chewy? The Choc Coconut Ice Tray Bake is your answer! This classic Aussie-inspired treat brings together the sweet, chewy texture of coconut ice with a rich dark chocolate topping — all in a simple tray bake format.
With its nostalgic pink hue, creamy condensed milk base, and bold chocolate layer, this recipe is as beautiful to look at as it is delicious to eat. It’s perfect for kids’ parties, holiday trays, bake sales, or an easy afternoon indulgence.
Even better? It’s no-bake and uses basic pantry ingredients — just mix, press, melt, and chill! The hardest part is waiting for it to set.
Whether you grew up eating coconut ice or you’re new to the world of retro no-bake slices, this version adds a decadent chocolate twist while keeping the process fun and fuss-free.
Let’s dive in and create your very own batch of Choc Coconut Ice Tray Bake — it’s the kind of treat that disappears fast, so maybe make a double batch!
Why You’ll Love This Choc Coconut Ice Slice
1. No Oven Required
- Perfect for hot weather or quick prep
- No-bake means less cleanup and no cooking stress
2. Rich & Decadent Flavour
- Creamy sweetened condensed milk
- Fragrant vanilla
- Dark chocolate with a hint of butter for a glossy, soft finish
3. Eye-Catching Presentation
- Pretty pink hue and clean chocolate layer make this a showstopper
- Great for gift boxes or party platters
4. Foolproof & Kid-Friendly
- Simple mixing and melting steps
- Great beginner recipe or family cooking activity
5. Make-Ahead Magic
- Keeps for up to a week in the fridge
- Can be made ahead for events or stored as an emergency sweet treat
Ingredients
(Makes one 20 cm × 20 cm tray – about 16 slices)
Coconut Ice Layer
- 395 g sweetened condensed milk (1 can)
- 250 g desiccated coconut (about 2½ cups)
- 1 tsp vanilla extract
- A few drops pink gel food colouring (or red liquid food colouring)
Chocolate Topping
- 200 g dark chocolate (60–70% cocoa), chopped
- 50 g unsalted butter
Preparation
Step 1: Prepare the baking tray
Line a 20 cm × 20 cm square baking tray or cake pan with baking paper, leaving some overhang on the sides for easy removal later.
Step 2: Make the coconut ice base
In a large mixing bowl, combine the sweetened condensed milk, desiccated coconut, and vanilla extract. Stir until the mixture is evenly combined and thick.
Add a few drops of pink gel food colouring and mix thoroughly until the colour is even throughout. You can adjust the shade to your liking — a pale pastel pink or bold fairy floss hue.
Once combined, press the mixture firmly and evenly into the base of the prepared tray. Use the back of a spoon or a spatula to smooth the surface. Refrigerate for at least 30 minutes to set.
Step 3: Prepare the chocolate topping
Place the chopped dark chocolate and unsalted butter in a heatproof bowl. Melt together either:
- Over a double boiler (sitting the bowl over a pot of simmering water)
- Or using the microwave, heating in 20-second bursts and stirring between each until smooth
Once melted and glossy, allow the chocolate mixture to cool for 1–2 minutes before pouring.
Step 4: Pour and set the topping
Pour the melted chocolate mixture over the chilled coconut base. Gently tilt the tray to evenly coat the entire surface. Use a spatula or offset knife to smooth out any air bubbles or streaks.
Place the tray back into the fridge and chill for 1–2 hours, or until the chocolate is firm to the touch.
Step 5: Slice and serve
Remove the tray from the fridge and allow it to sit at room temperature for 5–10 minutes before slicing — this helps prevent the chocolate from cracking.
Using a sharp knife, cut into 16 even squares or smaller bite-sized pieces. Wipe the knife clean between slices for sharp, clean edges.
Variation Ideas
- Minty Coconut Ice: Replace vanilla extract with ½ tsp peppermint extract for a refreshing twist.
- Nutty Crunch: Add ½ cup finely chopped almonds or macadamias to the coconut layer for texture.
- White Chocolate Version: Swap the dark chocolate for white chocolate if you prefer a creamier finish.
- Two-Tone Ice: Divide the coconut mixture in half — tint one half pink and leave the other plain for a traditional layered look.
- Festive Touch: Add red and green sprinkles on the chocolate layer for a Christmas variation.
Creative Variations
Colour Twists
- Use half pink and half white coconut for a traditional layered look.
- Add a second colour like lavender or mint green for rainbow vibes.
Flavour Upgrades
- Add orange or raspberry extract for a fruity twist.
- Stir in lime zest or coconut essence for tropical flair.
Chocolate Options
- Use milk chocolate or white chocolate instead of dark.
- Add a sprinkle of sea salt or crushed nuts to the top before it sets.
Decorative Toppings
- Sprinkle with toasted coconut, sprinkles, or edible glitter before chilling.
- Add a swirl of melted white chocolate for a marbled finish.
COOKING Note
While this slice is no-bake, it’s important to let each layer chill properly to achieve clean, firm slices. For a faster set, place the tray in the freezer for 30 minutes, then refrigerate. However, for long-term storage, always keep it in the fridge.
Use good-quality dark chocolate with at least 60% cocoa for the topping — it balances the sweetness of the coconut base beautifully.
Serving Suggestions
- Serve with tea, coffee or hot chocolate at afternoon tea.
- Include on dessert grazing boards or holiday platters.
- Wrap individual squares in cellophane for party favours or edible gifts.
- Keep chilled in the fridge and sneak a square when you need a sweet fix!
Tips
- Use gel food colouring for more vibrant, controlled colour without altering the texture.
- If using white chocolate, melt slowly to prevent seizing.
- Line the tray fully with baking paper to make lifting out and slicing easier.
- For cleaner layers, refrigerate each stage fully before adding the next.
- Store in an airtight container in the fridge for up to 7 days, or freeze for up to 2 months.
⏱️ Time Overview
- Prep Time: 10 minutes
- Chilling Time: 2 hours
- Total Time: Approx. 2 hrs 10 mins
Nutritional Information (per square, approx.)
- Calories: ~230 kcal
- Protein: ~2.4 g
- Fat: ~13 g
- Saturated Fat: ~9 g
- Carbohydrates: ~24 g
- Sugar: ~20 g
- Sodium: ~40 mg
Note: These values are estimates and may vary depending on ingredient brands used.
Safety & Troubleshooting
✅ Safety Tips:
- Supervise young children when handling food colouring and melting chocolate.
- Use gel food colouring to avoid over-liquifying the coconut base.
⚠️ Troubleshooting Guide
| Problem | Solution |
|---|---|
| Base is too wet or runny | Add a bit more desiccated coconut and mix again |
| Chocolate won’t melt smoothly | Add a splash of cream or extra butter to loosen it |
| Coconut layer won’t slice cleanly | Warm knife slightly and wipe between cuts |
| Chocolate cracks when slicing | Let tray bake sit out for 10 mins before cutting |
FAQs
Q: Can I use milk chocolate instead of dark?
A: Absolutely! Milk chocolate will make the slice sweeter and more kid-friendly. Dark chocolate offers a better contrast to the sweet coconut layer.
Q: How long can I store this in the fridge?
A: Up to 1 week in an airtight container.
Q: Can I freeze this slice?
A: Yes! It freezes well. Just place baking paper between layers and thaw at room temperature.
Q: Can I skip the food colouring?
A: Yes, you can make it naturally white or add other natural colourings like beetroot powder.
Conclusion
The Choc Coconut Ice Tray Bake is the perfect modern-meets-nostalgia dessert. With its chewy coconut layer and rich dark chocolate top, this no-bake treat is delightfully simple yet utterly satisfying.
Whether you’re feeding a crowd, prepping for a special event, or just craving a little afternoon indulgence, this slice delivers — every single time. And best of all, it’s easy, budget-friendly, and freezer-stash ready.
Print
Choc Coconut Ice Tray Bake
- Total Time: Approx. 2 hrs 10 mins
Ingredients
Ingredients
(Makes one 20 cm × 20 cm tray – about 16 slices)
Coconut Ice Layer
- 395 g sweetened condensed milk (1 can)
- 250 g desiccated coconut (about 2½ cups)
- 1 tsp vanilla extract
- A few drops pink gel food colouring (or red liquid food colouring)
Chocolate Topping
- 200 g dark chocolate (60–70% cocoa), chopped
- 50 g unsalted butter
Instructions
Preparation
Step 1: Prepare the baking tray
Line a 20 cm × 20 cm square baking tray or cake pan with baking paper, leaving some overhang on the sides for easy removal later.
Step 2: Make the coconut ice base
In a large mixing bowl, combine the sweetened condensed milk, desiccated coconut, and vanilla extract. Stir until the mixture is evenly combined and thick.
Add a few drops of pink gel food colouring and mix thoroughly until the colour is even throughout. You can adjust the shade to your liking — a pale pastel pink or bold fairy floss hue.
Once combined, press the mixture firmly and evenly into the base of the prepared tray. Use the back of a spoon or a spatula to smooth the surface. Refrigerate for at least 30 minutes to set.
Step 3: Prepare the chocolate topping
Place the chopped dark chocolate and unsalted butter in a heatproof bowl. Melt together either:
- Over a double boiler (sitting the bowl over a pot of simmering water)
- Or using the microwave, heating in 20-second bursts and stirring between each until smooth
Once melted and glossy, allow the chocolate mixture to cool for 1–2 minutes before pouring.
Step 4: Pour and set the topping
Pour the melted chocolate mixture over the chilled coconut base. Gently tilt the tray to evenly coat the entire surface. Use a spatula or offset knife to smooth out any air bubbles or streaks.
Place the tray back into the fridge and chill for 1–2 hours, or until the chocolate is firm to the touch.
Step 5: Slice and serve
Remove the tray from the fridge and allow it to sit at room temperature for 5–10 minutes before slicing — this helps prevent the chocolate from cracking.
Using a sharp knife, cut into 16 even squares or smaller bite-sized pieces. Wipe the knife clean between slices for sharp, clean edges.
- Prep Time: 10 minutes
- Chilling Time: 2 hours
Nutrition
- Calories: ~230 kcal
- Sugar: ~20 g
- Sodium: ~40 mg
- Fat: ~13 g
- Saturated Fat: ~9 g
- Carbohydrates: ~24 g
- Protein: ~2.4 g